Safe Room Q & A
What is a safe room? What are the design requirements for a FEMA safe room?
A safe room is a hardened structure specifically designed to meet FEMA criteria and provide "near-absolute protection" in extreme weather events, including tornadoes and hurricanes. The level of protection provided by a safe room is a function of its design parameters, specifically the design wind speed and resulting wind pressure and the wind-borne debris load resistance. To be considered a FEMA safe room, the structure must be designed and constructed to the guidelines specified in FEMA P-320, Taking Shelter
from the Storm: Building a Safe Room for Your Home or Small Business (FEMA, third edition, 2008a) (for home and small business safe rooms). Additionally, all applicable Federal, State, and local codes must be followed. When questions arise pertaining to the differences between FEMA P320 criteria and another code or standard, the most conservative criteria should apply.
Should I have a safe room?
Pages 6 through 10 of FEMA P-320 (FEMA, 2008a) provide background information to help homeowners decide if a safe room is needed in their home. Homeowners and small-business owners should also refer to the Homeowner’s Worksheet, Assessing Your Risk (Table I-1) in FEMA P-320 (FEMA, 2008a); this is an easy-to-use matrix that helps users decide whether a safe room is a matter of preference, should be considered, or is the preferred method for protection from extreme winds.
My house has a basement. Do I need a safe room?
Some strong tornadoes have resulted in loss of floor framing, collapse of basement walls, and death and injuries to individuals taking refuge in a basement. What constitutes an acceptable level of protection is an individual decision. A basement may be the safest place to seek shelter for homes without a safe room, but it will not provide the same level of protection as a safe room unless it has been designed and constructed to provide the level of protection in accordance with FEMA P-320 (FEMA, 2008a) and FEMA P-361 (FEMA, 2008b).
A basement is a good location to install a shelter or build a safe room, but access for handicapped or physically challenged individuals may be limited. The flood risk of your location may also affect whether it is appropriate to place a safe room in your basement. If your house or neighborhood is prone to flooding, the basement may not be an appropriate location for taking refuge.
Where can I find information about obtaining FEMA funding to construct a safe room? Are there any funds available in my area?
For project eligibility and financial assistance questions, please contact your Local Emergency Manager. Your Emergency Manager can advise you on what information must be provided for your project to be considered for funding, as well as any applicable Federal, State, and local design requirements.
Can I still apply for FEMA funding after I have begun construction of a safe room or purchased a safe room?
No. You must apply for funding before the purchase of a safe room or beginning any construction. Section D.2, Part III of FY 2011 Hazard Mitigation Assistance Unified Guidance (FEMA, 2010) states that costs related to projects for which actual physical work (such as groundbreaking, demolition, or construction of a raised foundation) has occurred prior to award or final approval are ineligible.
What costs are eligible for funding under a safe room grant?
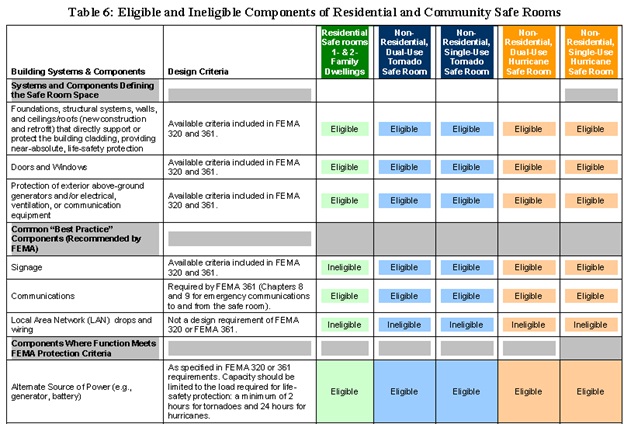
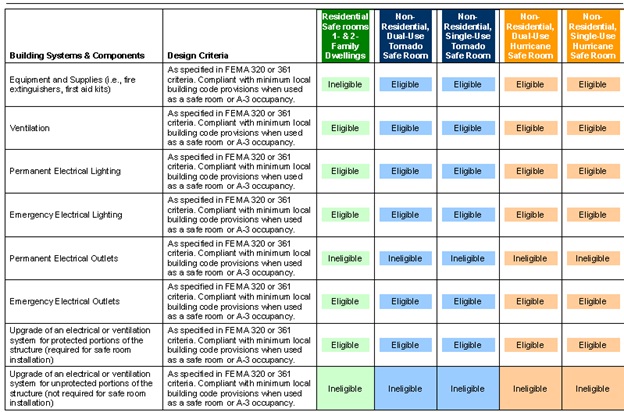
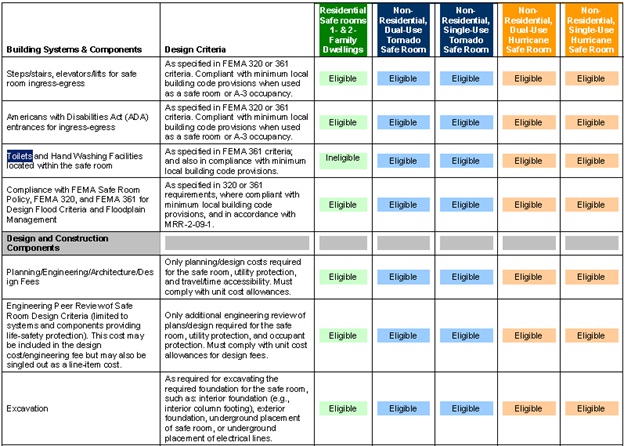
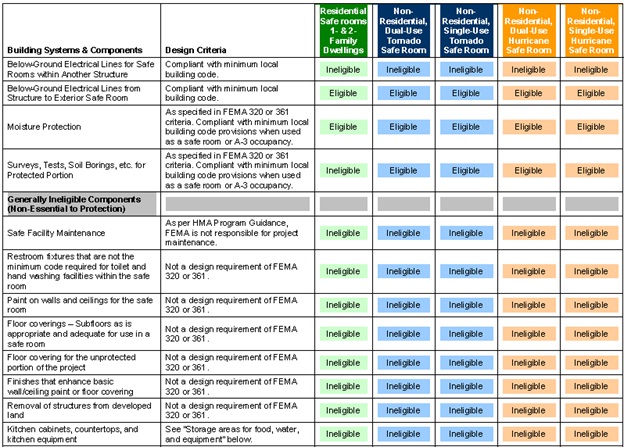
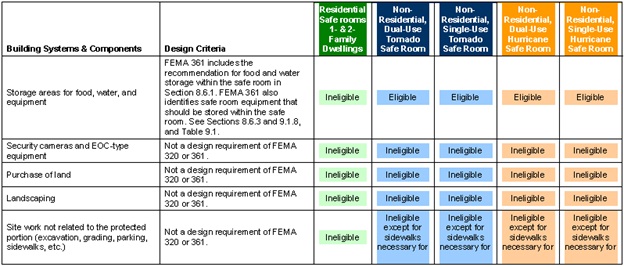
Allowable costs for safe room projects funded under FEMA’s Hazard Mitigation Grant Program (HMGP) are those components related to, and necessary for, providing life safety for building residents in the immediate vicinity during an extreme-wind event. The funding covers design and building costs related to structural and building envelope protection. The funding covers both retrofits to existing facilities and new construction projects, and applies to both single- and multi-use facilities.
Eligible costs are only those consistent with FEMA-approved performance criteria as provided in FEMA P-320 (FEMA, 2008a). These criteria are summarized in Table 6 (below) of the 2011 FY FEMA Hazard Mitigation Assistance Unified Guidance (FEMA, 2010). (Click the table to view it larger.)
Does FEMA approve, endorse, or certify any products?
No. Federal No. Federal policy does not allow FEMA to approve, endorse, certify, or recommend any products. While a product may be in compliance with FEMA design guidance, any language from manufacturers stating their product is "FEMA approved" or "FEMA certified" is incorrect.
What is the recommended square footage per person for a residential tornado and hurricane safe room?
For residential safe rooms, the usable tornado safe room floor area should be the gross floor area minus the area of sanitary facilities, if any, and should include the protected occupant area between the safe room walls at the height of any fixed seating, if it exists. The minimum recommended safe room floor area per occupant for residential tornado and hurricane safe rooms is provided in table below. (Click the table to view it larger.)

What is the cost of installing a safe room in a new home or small business?
Costs for construction vary across the United States. The cost for constructing a safe room that can double as a master closet, bathroom, or utility room inside a new home or small business ranges from approximately $6,600 to $8,700 (in 2011 dollars). This cost range is applicable to the basic designs in FEMA P-320 (FEMA, 2008a) for an 8-foot by 8-foot safe room (approximately 64 square feet of protected space). Larger, more refined designs for greater comfort cost more, with 14 foot by 14-foot safe rooms ranging in cost from approximately $12,000 to $14,300. The cost of the safe room can vary significantly, depending on the following factors:
- The size of the safe room
- The location of the safe room within the home or small business
- The number of exterior home walls used in the construction of the safe room
- The type of door used
- The type of foundation on which the safe room is constructed
- The location of the home or small business within the United States
For additional cost information for small safe rooms in a home or small business, see FEMA P-320 (FEMA, 2008a), Section II, page 34.
As a homeowner, can I build the safe room on my own?
A homeowner who builds a safe room should be skilled in building construction. Some pre-fabricated safe rooms are available that require less building construction experience to successfully install. In purchasing any safe room, the homeowner should obtain sufficient documentation to determine that the safe room is built to the FEMA safe room design and protection criteria.
Can I install a safe room in an existing home?
Yes, though installing a safe room in an existing home or small business is typically more expensive and challenging than installing one in a new building. Modifying the walls or foundation of an existing building for the construction of a safe room is more complicated than constructing those elements new and, as a result, some of the prescriptive safe room designs provided in FEMA P-320 (FEMA, 2008a) are not practical for some existing homes. Typically, installing a safe room in an existing home costs 20 percent more than installing the same safe room in a new home under construction.
Due to the technical challenges involved in retrofitting an existing home for a safe room,
an architect or engineer should be consulted to address the structural issues and the wind-borne debris protection criteria, even when not required by the local building department. As such, homeowners must balance the desire to have protection within their home with the practicality of constructing a safe room outside the footprint of their existing home or structure for less money. For more information on retrofitting existing buildings with a safe room, see FEMA P-320 (FEMA, 2008a), Section II, page 25.
Is an underground safe room safer than one above ground?
As long as a safe room is designed to meet or exceed the criteria in FEMA P-320 (FEMA, 2008a) and FEMA P-361 (FEMA, 2008b), it will offer the same near-absolute protection whether it is above or below ground.
Where is the best location for the safe room?
There are several possible locations in or near your home or small business for a safe room. The most convenient location in many homes is in the basement. If there is no basement within the home, or if the walls of the basement do not meet FEMA P-320 (FEMA, 2008a) design criteria, an in-ground safe room can be installed beneath a concrete slab-on-grade foundation or concrete garage floor. In-ground and basement safe rooms provide the highest level of protection against missiles and falling debris because they are typically shielded from direct forces of wind and debris; however,
above-ground designs, such as the prescriptive designs provided in FEMA P-320 (FEMA, 2008a) or any solution following the criteria set forth in FEMA P-361 (FEMA, 2008b) will provide near-absolute protection.
Many individuals prefer to build within their homes or buildings so they have some level of
protection while attempting to access their safe room. For an existing home or small business, this convenience must be balanced with the challenges of retrofitting the building. For more information on selecting the location of a safe room within your home or small business, see FEMA P-320 (2008a), Section II, page 27.
Are inspections required?
Obtaining proper building permits and inspections is important for all construction. The builder or homeowner should ensure the safe room is built according to the plans in FEMA P-320 (FEMA, 2008a) or to plans that, through testing and engineering, have been determined to meet the safe room design criteria in FEMA P-320 (FEMA, 2008a) or FEMA P-361 (FEMA, 2008b). The level of construction needed for a safe room typically requires a permit from the local building department. Further, to verify compliance with the FEMA or International Code Council (ICC)-500 (ICC, 2008) criteria, additional quality control inspections for community safe rooms, and often for residential safe rooms, may be needed.
If the Storm shelter costs $6,000.00 can I get more than $2,000 reimbursed?
No, the Hazard Mitigation Program only allows reimbursements up to 75% of the approved costs.
I need to have my Storm Shelter money up front to pay my contractor. Is this possible?
No, The money is only available as a reimbursement, AFTER construction is completed and you have submitted signed and notarized documentation from your contractor stating your Storm Shelter meets or exceeds the specification set forth in FEMA Publication 320.
If I am eligible to receive the $2,000 rebate, do I have to consider that money as income for State and Federal Income Tax purposes?
No, in accordance with the Robert T. Stafford Disaster Relief and Emergency Assistance Act, as amended, these funds are considered free from tax liability under Federally funded assistance programs.
Emergency Food & Water Supply
If a tornado, ice storm, winter storm or other disaster ever strikes your community, you might not have access to food, water and electricity for days. By taking a little time now to store emergency food and water supplies, you can provide for your entire family.
WATER: THE ABSOLUTE NECESSITY
Stocking water reserves should be among your top priorities in preparing for an emergency. You should store at least a three-day supply of water for each member of your family. Everyone's needs will differ, depending upon age, physical condition, activity, diet and time of year. A normally
active person needs to drink at least two quarts of water each day, but the heat of summer can cause a person to need double that amount. Children, nursing mothers and ill people will also need more. You will need additional water for food
preparation and hygiene, so it is recommended that you store a total of at least one gallon per person, per day.
How To Store Emergency Water Supplies
You can store your water in thoroughly washed plastic, glass,
fiberglass or enamel-lined metal containers. Never use a container that has held toxic substances, because tiny amounts may remain in the container's pores. Sound plastic containers, such as soft drink bottles, are best.
Before storing your water, treat it with a preservative, such as chlorine bleach, to prevent the growth of microorganisms. Use liquid bleach that contains 5.25 percent sodium hypochlorite and no soap. Add four drops of bleach per quart of water (or
two scant teaspoons per 10 gallons), and stir. Seal your water containers tightly, label them and store them in a cool, dark place.
Another method to store water is to simply purchase bottled water and leave the seals intact, but remember to rotate your water every six months or as date stamped on the bottles.
Hidden Water Sources in Your Home
If a disaster catches you without a stored supply of clean water,
you can use water in your hot-water tank, in your plumbing and in ice cubes. As a last resort, you can use water in the reservoir tank of your toilet (not the bowl), but purify it
first (described later).
Water beds hold up to 400 gallons, but some water beds contain toxic chemicals that are not fully removed by many purifiers. If you designate a water bed in your home as an emergency resource, drain it yearly and refill it with fresh water containing two ounces of bleach per 120 gallons.
To use the water in your pipes, let air into the plumbing by turning on the highest faucet in your house and draining the water from the lowest one.
To use the water in your hot-water tank, be sure the electricity or gas is off, and open the drain at the bottom of the tank. Start the water flowing by turning off the water intake valve and turning on a hot-water faucet. Do not turn on the gas or electricity when the tank is empty.
Do you know the location of your incoming water valve? You'll need to shut if off to stop contaminated water from entering your home if you hear reports of broken water or sewage lines.
Family Disaster Supply Kit
It's 2:00 a.m. and a railroad derailment has caused officials to order an evacuation of half of the community. There's no time to gather food from the kitchen, fill bottles with water, grab a first-aid kit from the closet and snatch a flashlight and a portable radio from the bedroom. You need to have these items packed and ready in one place before disaster hits.
Pack at least a three-day supply of food and water, and store it in a handy place. Choose foods that are easy to carry, nutritious and ready-to-eat. In addition, pack these emergency items:
- Medical
supplies and first aid manual
- Hygiene
supplies
- Portable
radio, flashlights and extra batteries
- Shovel
and other useful tools
- Money
and matches in a waterproof container
- Fire
extinguisher
- Blanket
and extra clothing
- Infant
and small children's needs (if appropriate)
FOOD: PREPARING AN EMERGENCY STOCKPILE
If activity is reduced, healthy people can survive on half their usual food intake for an extended period and without any food for many days. Food, unlike water, may be rationed safely, except for children and pregnant women.
If your water supply is limited, try to avoid foods that are high in fat and protein, and don't stock salty foods, since they will make you thirsty. Try to eat salt-free crackers, whole grain cereals and canned foods with high liquid content.
You don't need to go out and buy unfamiliar foods to prepare an emergency food supply. You can use the canned foods, dry mixes and other staples on your cupboard shelves. In fact, familiar foods are important. They can lift morale and give a feeling
of security in time of stress. Also, canned foods won't require cooking, water or special preparation. The following are recommended short-term and long-term food storage plans.
Storage Tips
- Keep
food in the driest and coolest spot in the house, a dark area if possible.
- Keep
food covered at all times.
- Open
food boxes or cans carefully so that you can close them tightly after each use.
- Wrap
cookies and crackers in plastic bags, and keep them in tight containers.
- Empty
opened packages of sugar, dried fruits and nuts into screw-top jars or air-tight cans to protect them from pests.
- Inspect
all food containers for signs of spoilage before use.
Short-Term Food Supplies
Even though it is unlikely that an emergency would cut off your food supply for a week, you should prepare a supply that will last that long. A supply that will last for a week can relieve a great deal of inconvenience and uncertainty until services are restored.
The easiest way to develop a stockpile is to increase the amount of basic foods you normally keep on your shelves. Remember to compensate for the amount you eat from other sources (such as restaurants) during an average week.
You may already have a supply of food on hand that will last for a week. Keeping it fresh is simple. Just rotate your supply once or twice a year.
Special Considerations to Keep in Mind
As you stock food, take into account your family's unique needs and tastes. Try to include foods that they will enjoy and that are also high in calories and nutrition. Foods that require no refrigeration, preparation or cooking are best.
Individuals with special diets and allergies will need particular attention, as will babies, toddlers and the elderly. Nursing mothers may need liquid formula, in case they are unable to nurse. Canned dietetic foods, juices and soups may be helpful for the ill or elderly.
Make sure you have a can opener and disposable utensils. And don't forget nonperishable foods for your pets.
How to Store Your Short-Term Stockpile
Keep canned foods in a dry place where the temperature is fairly cool--not above 70 degrees Fahrenheit and not below freezing.
Rotate your food supply. Use foods before they go bad, and replace
them with fresh supplies, dated with ink or marker. Place new items at the back of the storage area and older ones in front.
How to Cook if the Power Goes Out
For emergency cooking you can use your propane or charcoal grill or camp stove outdoors only. Canned food can be eaten right out of the can. If you heat it in the can, be sure to open the can and remove the label first.
Nutrition Tips
In a crisis, it will be vital that you maintain your strength. So remember:
- Eat at least one well-balanced meal each day.
- Drink enough liquid to enable your body to function properly (two quarts a day).
- Take in enough calories to enable you to do any necessary work.
Family Disaster Plan
Disaster can strike quickly and without warning. It can force youto evacuate your neighborhood or confine you to your home. What would you do if basic services--water, gas, electricity or telephones--were cut off? Local officials and relief workers will be on the scene after a disaster, but they will not be able to reach everyone right away, so it is important for you to develop a plan for you and your family.
Families can, and do, cope with disaster by preparing in advance and working together as a team. Follow the steps below to create your family's disaster plan. Knowing what to do is your best protection and your responsibility.
Where will your family be when disaster strikes? They could be anywhere--at work, at school or in the car.
How will you find each other? Will you know if your children are safe?
4 STEPS TO SAFETY
1. Find Out What Could Happen to You
Contact the Emergency Management office or the Ft. Kearney Chapter of the American Red Cross.
- Ask what types of disasters are most likely to happen in Kearney and the surrounding area. Request information on how to prepare for the different types of emergencies that could occur.
- Learn about the existing warning signals in Buffalo County: what they sound like (outdoor warning sirens), and that the alert signal should indicate to all citizens to tune to local radio or television for emergency information and instructions.
- Ask about animal care after a disaster. Animals will not be allowed inside emergency shelters due to health regulations, so prepare a plan for your pets.
- Find out how to help elderly or disabled persons, if needed.
- Next, find out about the disaster plans at your workplace, your children's school or daycare center and other places where your family spends time.
2. Create a Disaster Plan
Meet wiith your family and discuss why you need to prepare for disaster. Explain the dangers of fire, severe weather and hazardous materials to children. Plan to share responsibilities and work together as a team.
- Discuss the types of disasters that are most likely to happen. Explain what to do in each case.
- Pick two places to meet;
- Right outside your home in case of a sudden emergency, like a fire.
- Outside your neighborhood in case you can't return home. Everyone must know the address and phone number.
- Ask an out-of-state friend to be your "family contact." After a disaster, its often easier to call long distance. Other family members should call this person and tell them
where they are. Everyone must know your contact's phone number.
- Discuss what to do in an evacuation. Plan how to take care of your pets.
3. Complete This Checklist
- Post emergency telephone numbers by your telephones or have them programmed into your phone (fire, police, EMS, etc.)
- Teach children how and when to call 911 for emergency help.
- Show each family member how and when to turn off the water, gas and electricity at the main switches.
- Check if you have adequate insurance coverage.
- Teach each family member how to use a fire extinguisher (ABC type), and show them the designated locations where they are kept in the house.
- Install smoke detectors on each level of your home, especially near bedrooms.
- Conduct a home hazard hunt.
- Stock emergency supplies and assemble a Disaster Supplies Kit.
- Take a Red Cross first aid and CPR class.
- Determine the best escape routes from your home. Find two ways out of each room.
- Find the safe spots in your home for each type of disaster, including your Shelter-in-Place spot.
4. Practice and Maintain Your Plan
- Quiz your children every six months so they remember what to do.
- Conduct fire and emergency evacuation drills.
- Replace stored water every three months and stored food every six months.
- Test and recharge your fire extinguisher(s) according to manufacturer's instructions.
- Test your smoke detectors monthly and replace the batteries the same weekend as the time change occurs in the spring (daylight-savings time) and fall (standard time).
EMERGENCY SUPPLIES
Keep enough supplies in your home to meet your needs for at least three days. Assemble a Disaster Supplies Kit with items you may need in an evacuation. Store these supplies in sturdy, easy-to-carry containers such as backpacks, duffle bags or covered plastic containers. Include:
- A three-day supply of water (one gallon per person per day) and food that won't spoil.

- One change of clothing and footwear per person, and one blanket or sleeping bag per person.
- A first aid kit that includes your family's prescription medications.
- Emergency tools, including a battery-powered radio, flashlight and plenty of extra batteries.
- An extra set of car keys and a credit card, cash or traveler's checks.
- Sanitation supplies.
- Special items for infant, elderly or disabled family members.
- An extra pair of glasses.
- Keep important family documents in a waterproof container. Keep a smaller kit in the trunk of your car.
UTILITIES
Locate the main electric fuse box, water service main and natural gas main. Learn how and when to turn these utilities off. Teach all responsible family members. Keep necessary tools near gas and water shut-off valves.
Remember, turn off the utilities only if you suspect the lines are damaged or if you are instructed to do so. If you turn the gas off, you will need a professional to turn it back on.
NEIGHBORS HELPING NEIGHBORS
Working with neighbors can save lives and property. Meet with your neighbors to plan how the neighborhood could work together after a disaster until help arrives. If you're a
member of a neighborhood organization, such as a home association or neighborhood watch group, introduce disaster preparedness as a new activity. Know your neighbors' special skills (e.g., medical, technical) and consider how you could help neighbors who have special needs, such as disabled and elderly persons. Make plans for child-care in case parents are unable to get home during the emergency.
HOME HAZARD HUNT
During a disaster, ordinary objects in your home can cause injury or damage. Anything that can move, fall, break or cause a fire is a home hazard. Inspect your home at least once a year and fix potential hazards.
Contact the Kearney Volunteer Fire Department to learn about home fire hazards.
EVACUATION
Evacuate immediately if told to do so:
- Listen to your battery-powered radio and follow the instructions of local emergency officials.
- Wear protective clothing and sturdy shoes.
- Take your family disaster supplies kit.
- Lock your home.
- Use travel routes specified by local authorities--don't use shortcuts because certain areas may be impassable or dangerous.
If you're sure you have time:
- If instructed to do so, shut off water, gas and electricity before leaving.
- Post a note telling others when you left and where you are going.
- Make arrangements for your pets.
IF DISASTER STRIKES
- If disaster strikes
Remain calm and patient. Put your plan into action.
- Check for injuries
Give first aid and get help for seriously injured people.
- Listen to your battery powered radio for news and instructions.
- Evacuate, if advised to do so. Wear protective clothing and sturdy shoes.
Check for damage in your home...
- Use flashlights--do not light matches or turn on electrical switches, if you suspect damage.

- Check for fires, fire hazards and other household hazards.
- Sniff for gas leaks, starting at the water heater. If you smell gas or suspect a leak, turn off the main gas valve, open windows, and get everyone outside quickly.
- Shut off any other damaged utilities.
- Clean up spilled medicines, bleaches, gasoline and other flammable liquids immediately.
Remember to...
- Confine or secure your pets.
- Call your family contact--do not use the telephone again unless it is a life-threatening emergency.
- Check on your neighbors, especially elderly or disabled persons.
- Make sure you have an adequate water supply in case service is cut off.
- Stay away from downed power lines.
The Federal Emergency Management Agency's Family Protection Program and the American Red Cross' Disaster Education Program are nationwide efforts to help citizens prepare for disasters of all types. For more information, please contact the Emergency Management office, or the Fort Kearney Chapter of the American Red Cross. Start planning now.
Pets & Animals in a Disaster
Whether it's a large-scale natural catastrophe or an unforeseen emergency that causes you to leave your home temporarily, everyone's family can benefit from having a household evacuation plan in place before disaster strikes.
Every disaster plan must include your pets!
The Humane Society of the United States (HSUS) offers the following tips to pet owners designing an emergency safety plan:
- If you evacuate your home, DO NOT LEAVE YOUR PETS BEHIND! Pets most likely cannot survive on their own; and if by some remote chance they do, you may not be able to find them when you return.
- For public health reasons, many emergency shelters cannot accept pets. Find out which motels and hotels in your area allow pets -- well in advance of needing them. Include your local animal shelter's number in your list of emergency numbers -- they might be able to provide information concerning pets during a disaster.
- Make sure identification tags are up to date and securely fastened to your pet's collar. If possible, attach the address and/or phone number of your evacuation site. If your pet gets lost, his tag is his ticket home. Make sure you have a current photo of your pet for identification purposes.
- Make sure you have a secure pet carrier, leash or harness for your pet so that if he panics, he can't escape.
- Take pet food, bottled water, medications, veterinary records, cat litter/pan, can opener, food dishes, first aid kit and other supplies with you in case they're not available later. While the sun is still shining, consider packing a "pet survival" kit, which could be easily deployed if disaster hits.
- If you are unable to return to your home right away, you may need to board your pet. Most boarding kennels, veterinarians and animal shelters will need your pet's medical records to make sure all vaccinations are current. Include copies in your "pet survival" kit along with a photo of your pet.
- If it is impossible to take your pet with you to temporary shelter, contact friends, family, veterinarians, or boarding kennels to arrange for care. Make sure medical and feeding information, food, medicine and other supplies accompany your pet to his foster home. NOTE: Some animal shelters will provide temporary foster care for owned pets in times of disaster, but this should be considered only as a last resort.
- If you have no alternative but to leave your pet at home, there are some precautions you must take, but remember that leaving your pet at home alone can place your animal in great danger! Confine your pet to a safe area inside -- NEVER leave your pet chained outside! Place a notice outside in a visible area, advising what pets are in the house and where they are located. Provide a phone number where you or a contact can be reached as well as the name and number of your vet.

Not only are pets affected by disaster, but the other animals in the disaster area are affected as well. The HSUS offers these basic tips for people who encounter wildlife or have livestock on their property:
Wildlife
- Wild animals often seek higher ground, which, during floods, eventually become submerged (i.e., island) and the animals become stranded. If the island is large enough and provides suitable shelter, you can leave food appropriate to the species (i.e., sunflower seeds for squirrels). Animals have a flight response and will flee from anyone approaching too closely. If the animal threatens to rush into the water, back away from the island or you may frighten the animal into jumping into the water to escape from you
- Wildlife often seek refuge from flood waters on upper levels of a home and may remain inside even after the water recedes. If you meet a rat or snake face to face, be careful but don't panic. Open a window or other escape route and the animal will probably leave on its own. Never attempt to capture a wild animal unless you have the training, protective clothing, restraint equipment and caging necessary to perform
the job.
- Beware of an increased number of snakes and other predators who will try to feed on the carcasses of small mammals who have been drowned or crushed in their burrows or under rocks.
- Often, during natural disasters, mosquitoes and dead animal carcasses may present disease problems. Outbreaks of disease may occur. The local public health office will issue news releases to assist with aiding the public regarding health issues associated with the disaster.
- If you see an injured or stranded animal in need of assistance, or you need help with evicting an animal from your home, please contact your local animal control office or Nebraska Games and Parks.
Livestock
Evacuate Livestock Whenever Possible.
- Arrangements for evacuation, including routes and host sites, should be made in advance. Alternate routes should be mapped out in case the planned route is inaccessible.
- The evacuation sites should have or be able to readily obtain food, water, veterinary care, handling equipment and facilities.
- Trucks, trailers, and other vehicles suitable for transporting livestock (appropriate for transporting each specific type of animal) should be available along with experienced handlers and drivers to transport them. Whenever possible, the animals should be accustomed to these vehicles in advance so they're less frightened and easier to move.
- If evacuation is not possible, a decision must be made whether to move large animals to available shelter or turn them outside. This decision should be determined based on the type of disaster and the soundness and location of the shelter (structure).
- All animals should have some form of identification that will help facilitate their return.
Your disaster plan should include a list of emergency phone numbers for local agencies that can assist you if disaster strikes -- including your veterinarian, state veterinarian, local animal shelter, animal care and control, and county extension service. These numbers should be kept with your disaster kit in a secure, but easily accessible place.
For additional information, please contact:
The Humane Society of the United States
2100 L. Street, NW
Washington, DC. 20037
Attn: Disaster Services Program
Phone: (202) 452-1100
Website: http://www.hsus.org
|